Thursday, October 22, 2015

2016 Salsa Warbird Carbon short-term review

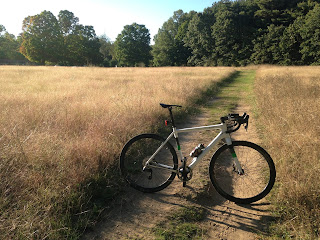
I received my Salsa Warbird Carbon just over a month ago and have finally logged 500 miles. Before i review a bike, i like to get at least a few hundred miles on it, and get it dialed in the way i like. My first impressions of the bike were great; i love the look of the frame, the color scheme is sweet, and the build kit is on or slightly above par for what i would expect at that price. It's nice to get a bike that comes with a Thomson cockpit right off the bat, that's one less thing i'm inclined to swap out haha!

The Salsa Cowbell 2 handlebars were one of the things i was really looking forward to trying out on this bike. The traditional drop bars aren't exactly comfortable over the course of a couple hundred miles, and having the drops flare out so there's more room for your forearms is a bonus. I like the extra width and stability, and being a gravel/backroad bike it isn't a concern like it may be for cross or road racing. I also like the way the levers mount up and feel on these bars, overall i'm very happy with the comfort and control they afford.

The SRAM rival groupset was something i was curious to see in person. To be honest, i would have expected Force on a "top level" bike, but i was quickly convinced after a few rides that it would be an unnecessary expense to add. The 2x11 groupset has all the good trickle down technology that once only came on Red and Force level parts; front derailleur with Yaw, zero loss shifters, hydro disc brakes with centerline rotors, wi-fli rear derailleurs, well you get the point. Something i take into consideration too is the cost of replacement for the parts and relative benefit of upgrading to the next level group. For this bike, my main concern is to have a reliable drivetrain and braking for the most grueling of terrain and race courses, and the Rival delivers on that front. I'd much rather replace a Rival rear derailleur than a Red one, and i feel that the Rival is a more robust design with the use of alloy over carbon. The one change i made was to go to a 1x front setup on my ride. If i head out to the mountains, i'll throw the 2x back on, but for the majority of what i do i don;t find it necessary. Overall, i like the feel of the Rival setup, the Hydro brakes feel great, the shifting is crisp and after a bout with a gravel road wipeout the front shifters are solid!
DT Swiss wheels come as standard equipment on this model, and they're a nice robust build to handle the rigor they're intended for. I personally ride Velocity USA Ailerons laced to Industry 9 hubs, so i swapped to those fairly early on, but i like having the DT Swiss wheels setup with a different tire option so i can switch between narrow (32-35C) and wider (40-44C) tires if conditions or terrain call for it. I setup the stock wheels tubeless with WTB Nano 40c tires, and i run Kenda Small block 8 32c tires tubeless on my Ailerons.
As far as the frameset goes, i like the pop of color that the white offers to my stable, and the green/black/gray banding gives some additional color to tie bottle cages, handlebar tape and other accessories into. Having dual thru axles is a great call on a bike like this, and i very much like the DT Swiss style thru axles with the ratcheting adjustment for the handles, i feel like they have less moving parts than their other thru axle brethren and do the job quite nicely. A big bonus on this frameset is the ample tire and mud clearance! At DK200 this year i very much wish i had the room for mud and wider tires that this frame affords. With the 40c tires there's still more clearance than there is on my cross bike with 32c tires! The compliance built into the flattened chainstays is a very welcome design element on those long days in the saddle. The tube shapes are clean and are easy to strap light batteries, framebags and other accessories to. Having the ability to carry three water bottles is nice as well, and not a feature you find on many bikes. I was skeptical when gravel specific bikes first came out, and figured my cross bike wasn't far off, but i have found that this is far from the truth. The geometry of this bike is far more stable and confidence inspiring than my cross bike on harrowing descents and long stretches of loose gravel. I suppose if you only find yourself riding gravel from time to time then a cross bike will do the trick, but for as often as i find myself riding two-tracks, fire-roads, gravel and the ilk i find it very nice to have a steed built for the task!


Wednesday, October 14, 2015

Marji Gesick 100 - A ripping good time in the UP!

After doing several long races this spring and summer i thought i had said goodbye to endurance races for the rest of the year, but when i heard about the Marji Gesick 100 i quickly knew that was out the window. I love riding in Marquette and the surrounding area, the wide variety of terrain from rocky to roots to steep climbs and fast descents offer a bit of something for everyone. This race promised all of that and more; starting near Harlow Lake, stopping at the north trails, buzzing through town and into the south trails, winding up to Ishpeming and  ripping through many of the trails up there it promised to be epic! Packet pickup was held at Blackrocks brewery, which is always a good idea (beers and bike talk, what more could you ask for?), and the information was dolled out aplenty. Despite what would seem to be a logistical nightmare Todd, Danny and team assured us all it would be just fine.
Jenny and I made the trip up to rendezvous with other Grand Rapids folks Thursday evening before the race (huge thanks to Danielle for having us at her awesome crash pad and all the GRBC folks who made it up to hang out with). After an awesome breakfast at Donckers we headed out to Harlow lake to locate the start area and pre-ride the first section of trails. This was a great idea... the first section climbs nearly right out of the gate and winds through a mature forest plagued with roots and rocks. It was helpful to see the terrain in the daylight and know what to expect because the race start at 7:30 would be dark in the deep woods. Although the first 8-10 miles of the race proved to be challenging, we knew that it would only get tougher from there....
Once we were set of the first section of the race we elected to head down to the South Trails to scope out which gnarly lines would be included and where to cough up a lung. After cruising to the eastern trailhead on the bike path the course took us immediately up to the top of Marquette mountain on the gravel road. Once again, this was good to know as the ride through town would be a good recovery section beforehand and the best place to down some nutrition. After the summit the course dumped directly into "scary trail" and was certainly hair raising but left a grin on my face from ear to ear. From there the course stays in the south trails for quite sometime and there's an aid station position around mile 35 at the major trailhead.
Friday only allotted time for pre-riding those two sections before packet pickup and "recovery" beverage time. It's nice to gather at Blackrocks in a low key environment and trade info on the course before the race. Evan Simula had some great local knowledge of the area, and advised us that the majority of the work would need to be done in Ishpeming and to save our energy. As expected, Evan was 100% correct. The section from Marquette to Ishpeming doesn't allow for much "recovery" as it basically climbs the entire way, winds through sandy ORV trails and hits a few climbs along it's route. The aid station at Jackson park was awesome, the support crew did a fantastic job of attending to needs, cheering folks on, keeping the mood light and providing updates on the riders on course. After my race was over, i relied very much on this crew to provide me with updates on friends, teammates and of course my favorite rider, Jenny!
The sections in Ishpeming were challenging enough on their own, let alone after 6 plus hours in the saddle. It was critical to take ones time plodding through the rocky terrain and staying fueled along the way. After the last pit stop at mile 80 i wish i could say it was all downhill but that would be a terrible lie. Some of the final sections found us doing battle with rocky strewn two tracks and some fast descending singletrack. The final climb was a doozy but well worth the effort to complete the journey at the top of Jasper Knob. After nearly 100 miles and 11,000 feet worth of climbing it was a sight for sore eyes.
Now, here's a few insiders tips and lessons learned at the MJ100:
  • I would highly recommend full suspension if you've got it, i love my hardtail, but by the end of the day i was pretty shelled.
  • Ride some durable rubber for this route, go with something wider (2.25" plus) and with substantial protection from rocks and punctures.
  • If you've got a GPS such as a Garmin, load the course on there. The crew does an awesome job marking the trails, but there's always some yahoos that tear signs down. The markings to Carroll Jackson trail were all missing and many riders missed that section. I would have rode past it without having the course in front of me.
  • Carry plenty of food and water, the pace is slow and you end up pretty far away from aid stations at some points.
  • Go into the race prepared for an excellent adventure, don't focus on time/pace/metrics but rather approach it as a journey to be completed and enjoyed. The course uses some phenomenal terrain and it would be a shame to miss even a second of it!
  • Bring extra chamois cream....
  • Make arrangements/logistics to have a drop bag of clothes at the finish and access to a vehicle at some point. I spent much too long in my chamois riding my bike from the finish to the after party and to Jackson park. Thankfully others were prepared (Nate and Kim with the van and clothes and Evan with the enormous cooler of goodies) and i'm a good mooch.
  • Pre-ride some sections that look confusing or that you've never ridden, it helps to be familiar with the terrain and what to expect.
  • Have a good light for the start, it's dark in those woods and there's a couple of roots....\
  • If you're running a 1x drivetrain size your front ring as if you'd be climbing Alpe d'Huez....
  • Have fun, it's an experience of a lifetime!!!!
Huge thanks to Todd, his wife, Danny and Chris (aka Walter), and all of the other support staff. These fine folks made an amazing race that gives back to the trails they love!


Thursday, October 8, 2015

Using Strava for good, not evil... How to make a route on Strava!

Love it or hate it, Strava is one of the most popular cycling applications out there today. It's as simple or as in depth as you want to make it, and personally i use the many facets of it almost daily. Whether you like to record your rides or not, Strava has another big upside that i think gets left out a lot; route planning/building tools! There's several applications out there that you can use to build routes to upload on your GPS, but i find the Strava one to be the most useful and intuitive while providing many cool layers to aid in planning your next journey! 

Folks that know me know that i make lots of routes and enjoy doing so. I've made routes for weekend rides, group rides, recreated race routes, bikepacking routes... well, you get the idea. I'll also get people asking me to either make them routes or suggest ways to make routes so i figured i'd write up a quick blog post on how i create them (there's many ways and i'm sure not everyone will agree, but this is how i do it).

First off, when i open up the route builder, the first thing i like to do is turn on the Terrain layer and Heatmap. I like to see the topography of where i'm going to ride so i can plan accordingly (i like hills). The Heatmap is what sets the Strava builder apart from other tools. Basically Strava takes all of the user data it acquires and it shows "heat" intensity on roads/trails that people ride according to frequency (side note: this feature is available regardless of whther or not you are a premium member). Here's what the map looks like with those two layers turned on:

You can see the popular trails lit up in red along with the frequently used roads. I find the Heatmaps most useful when i'm planning routes for places i've never ridden like China haha! It's also a good way to search around an area you like to ride for little secret trails, paths, etc... 

As you draw a route, the builder estimates the mileage and elevation for your proposed route. The default for the drawing tool is an automatic snap which follows the known routes/trails/paths that Google has on their basemap. You may find that some of the trails or roads won't let you click or trace a route onto them, and that's where the manual mode comes into play. On the top toolbar you'll find the manual mode which you can toggle on to manually draw your route on the map. I find that i have to use this when trying to route over trails (Big M, Ski Hill, NCT, etc..).

Once you've drawn your route it's pretty easy to load it onto your device of choice, or if you have the Strava application for your smartphone you can run the route right from there. I have a Garmin 810 so that's what i frequently load files onto. So, you;ve got your route, you've clicked the Save button in the upper right hand corner, given it a cheeky name, and here's what you'll see:
Underneath that surprisingly creative name you've dubbed your desired journey you'll find a button that says "Export". If you click on this a dialogue box will open up that will allow you to select what GPS device you're using and how to load it onto said device:

While the Garmin GPS units may at first seem to be a box full of black magic, they're really quite simple when you break them down. If you plug your Garmin into your computer, Windows File explorer should pop up and show the Garmin as basically a glorified USB stick. Click on the folder called "Garmin" and then click on the folder titled "NewFiles" and that's where you drop that file that you saved from Strava and boom, done! When you turn the Garmin on you should find the route in your courses. One common mistake a lot of people make is to first, not read the directions shown on the screenshot above, and second, to open the "Garmin" folder and see a folder titled "Courses" and assume that's when you put your course file you downloaded. While that seems like it should make sense and work just fine, alas, it does not and you will be sans route if you try it that way. Probably something with the Garmin needing to digest the file in the "Newfiles" folder like a cow chews cud...


If you want more info on how to load stuff on Garmin devices, how the different ones function, how to use your smartphone, etc.. I would suggest Googling DC Rainmaker and searching through his massive amount of info on such subjects. 


Tuesday, October 6, 2015

Flats happen, don't be sad about stuff

If your tire is setup tubeless and it's still leaking days before a race do yourself a favor and just put one of those antiquated devices called a "tube" into it and call it a day. Many times, against my better judgement i have gone into races with something or another out of sorts whether it's with my bike, myself, clothing or nutrition. This past weekend was no exception, and i paid for it haha! The Michigan Mountain Mayhem Gravel Grinder is a pretty sweet event up in Boyne City, and goes through some beautiful countryside terrain (read hills). It typically draws all kinds of folks for one reason or another be it the sizable cash purse or the promise of good food and cold beers at the finish.


After a healthy warm-up and with the legs feeling good the 60 mile pack headed out onto the pavement to begin battle over the many hills. I'd love to report on the attacks, who was making what moves and what all went down, but the last i saw of the front group was a half mile into the race. Guy behind me says "hey, your tire is loosing air and stans!"... At this point there are a few options; head back to the start and get some warm clothes on and kick back, hang out with some folks and cruise the race as a tour, or the least common sense approach of attack and push relentlessly for seemingly no reason at all. Naturally, being a glutton for punishment i chose the latter approach. Frustration can mount quickly when one has to stop on four separate occasions to and air be it via pump or CO2 to ones tire. I guess the big thing to keep in mind is that it's all for fun, and to challenge yourself. There's not much point in getting bent about poor preparation or luck, just roll with it and give it hell!


It's often asked what the toughest part of competing in endurance events is and my opinion is that the mental aspect is for sure the most difficult. It's easy to get angry, frustrated or demoralized during an event that you've prepared so long for and looked forward to, and understandable in most cases. The thing is, you never know what can happen during a race, who else will suffer from mechanical or physical issues let alone the many other variables. Stick to the plan, use the adversity to fuel yourself and you might be surprised at what you can do. I would have to say that some of my most memorable race results or even just solo rides took place during adverse conditions or with many issues present.


The challenge; next time the chips are down, you've flatted, dropped a chain, wiped out, lost the pack, etc... push yourself to go harder than ever, pretend you're on the attack off the front, use each person you come on as fuel to go faster, don't stop and suck wheel, speed up and fly by! You might be surprised by the mental boost, maybe some increased confidence in your abilities or just the satisfaction that you emptied the tank. Challenge yourself to push beyond those "limits" either you'll amaze yourself at the result or blow up in a glorious ball of flames and either circumstance is something to be proud of!


Friday, October 2, 2015

Ch-Ch-Ch-Changes....

So i haven't done a great job at keeping this blog up to date.... I'm going to attempt at blogging more frequently by cutting down on the length of the posts and just throwing stuff on here i find interesting and others may as well.

This year has been pretty sweet so far, and the beginning of my thirties seems to be going well. I've changed teams to Grand Rapids Bicycle Company and Salsa Cycles! For the winter, i am joining forces with team 45NRTH! I've had several people ask "why the change?" or "when did this happen?". The answer is pretty straightforward, and it has nothing to do with any drama or issue with past sponsorship. Sometime ago i was notified by Redline that they would be eliminating the sponsorship for the mountain and cyclocross team folks, and that got things churning about "what next?". I've always been fond of racing for Freewheeler and have zero complaints about the team or the fine folks over there, they've been nothing short of awesome and i've always felt like a part of the family!

So, onto what's new! Really, the ball seemed to get rolling a bit after Dirty Kanza, and kept rolling from there. I took a look at who i race with, where i travel to, and what types of events i enjoy the most. Frequently i have traveled with the GR fatbike crew over the winters and during the summer with many of the endurance folks from the area. It seemed that i spent most of my time with many of the GRBC team riders and was having a good time doing so. Also, after some conversations i found myself a proud member of team 45NRTH for this coming winter season. As more and more conversations opened up i found myself talking with GRBC about joining the team and finding a suitable bike sponsor. Bikepacking, endurance racing, gravel, and pretty much any crazy adventure by bike races are what i love the most. Key words: adventure by bike... So, once Salsa Cycles came into the picture it was pretty much a done deal!

Now that the updates are out there, i'd like to focus on where this blog will go. I'd prefer it to be less about myself and more about the fun races and trips i have the fine fortune of being able to attend. The plan is to post up fun notes/routes/ideas about gravel and mountain bike riding, cool new gear, bikepacking, and fun races (basically all the stuff i find interesting on the interwebs). I'll try to keep the boring stuff to a minimum...